Pages

Search This Blog

21 November 2009

Bathroom vanity

This bathroom vanity was two years in the making- mostly because I just did not get it done earlier:)

The side panels are Spruce and Cedar. The door frames are Teak with Brazilian chestnut and Maple dividers. Rail and stile construction was used for the doors and frame of the vanity.

The handles are Mahogany with Walnut inlays.
The board above the doors is also Walnut.

I wanted to finish this project before our baby was due. My wife very patiently helped me with this project. The counter top is black granite.



10 October 2009

Zebra


This Zebra is based on the pattern I used for the horse. My inspiration for using two types of wood was from a friend of mine who turns wood pens using multi wood blanks to start with.


Two species of wood were needed for the different colours. I used walnut and maple. After the blank was glued up, I smoothed the edges with a smoothing plane. A small scraping plane was used to take out the tiny marks left in the wood. The final effect of the planes was a finish

that was absolutely flat.


When two different types of wood are used there will be differences in how the wood is sanded. The walnut is softer than the maple. I finished this project with Tung Oil and I was impressed with the way the colours of the wood came out.

19 August 2009

Hand tools


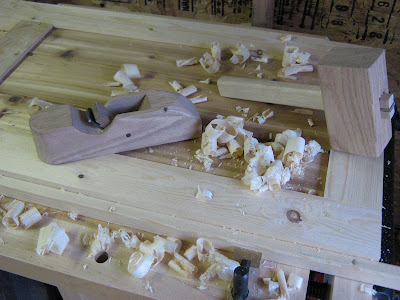
My collection of hand tools is slowly growing with the addition of a wood mallet and smoothing plane. The plane was made by myself at a Lee Valley workshop. I highly recommend this class at the Calgary Lee Valley. The plane was made in one day from a few pre-fabricated pieces of red oak. The blade and chipper are supplied as well. This wood smoothing plane works well when it's
tuned up correctly.

The wood mallet is made from red oak too. I built this in one evening in my shop. There are a few small things left to do- like shape the handle some more.

There is something really fascinating about using tools that you have made yourself. A real feeling of accomplishment.

31 July 2009

Horsepower


My niece was born yesterday in Salmon Arm, B.C. I made this horse on wheels for her.

This was my first project where I made a blank using two species of wood. In this case - walnut and maple
The mane and tail were made from hemp string.

17 February 2009

Happy Valentines Day


This bathroom cabinet was made by me for my wife ,for a Valentine's present. It was my first cabinet that I had constructed.

Pine is the material for the shelves and sides, and tongue-and-groove cedar
provided the back and panel on the door. The cabinet is 40" tall x 14 1/4 " wide x 9" deep.

Making the door was tricky. I had never made rail and stile (door)panels before so the door you see is the second and slightly mo' betta version of the door. Mounting the cabinet inside the wall between two studs allowed us to have an extra 5" of shelf depth without sacrificing space inside the bathroom.

08 February 2009

Toy Tractor


This toy tractor was made for my nephew in Manitoba. Walnut was used for the cab and front end. Hemlock is the chassis. Tung Oil is the finish I used to seal the wood. I like using Tung oil because it really brings out the colour of the wood.

Update: I've been having problems with the wood axles. The ends are chipping off.
I installed plastic washers between the axle and wheel and between the wheel and the chassis. This did not fix the problem. I made a dually rear axle assembly that turns as a unit. I wedged the axles at the ends where they come through the outside wheel. This modification will be a lot stronger. A picture will be coming soon!


10-4 good buddy - wood Semi Truck

My first attempt at semi truck took this form. The trailer and the cab were contructed from the re used church pews that my Opa had built. The hymn book holders were cut to length and joined face to face to make the " box" and cab.
The bumper was sort of an after thought because it is proud of the chassis. Actually, I had to glue a small spacer to make the bumper clear the front wheels.

I use water based coloured dyes for the finish. On this particular unit I rubbed in wax to seal the blue dye.

When I first started to experiment with finishes, I applied the coloured stain and let it dry. Next I applied water based Varathane. The Varathane would make the coloured stain run.

I've learned that you can mix water based Varathane with the coloured dye solution. The ratio is not critical but start with 50/50 and add dye as required to achieve the colour strength you are looking for.
When this coat is dry, apply the water based Varathane. The Varathane that was mixed the coloured dye will allow the straight Varathane to bind to the existing dye/Varathane mix.

I enjoy working with the coloured stains because of the different hues you can make and using a water based Varathane is easier on the lungs and hands - easy water wash up.

1/2 ton truck

This truck is modelled after a generic 1/2 ton pickup. It was the very first wood truck I had made back in Dec of 2007. I built it for my nephew who was only a few weeks old at the time.

I had some problems with locating axles holes in the chassis. From this project on I use a hand held dowel jig(Wolfcraft) and a cordless drill to accurately locate all the axles at exactly equal distance from the bottom of the chassis. This prevents the toy from rocking on a flat surface.

My nephew has put this toy to the ultimate test and has shown the axles to be less tough than I had estimated. The outboard end of the axles were breaking off - paralell with the grain.
I cut the axles off flush with the chassis and drilled new holes for the new axles. One washer goes under the axle 'hub' ( between the axle and the wheel) and one between the wheel and the chassis. I die cut plastic washers from an ice cream pail lid. (5/16" I.D. and 5/8" O.D.)
Time will tell if this will fix the broken axle problem. June 2009

Wooden Jeep and Kei truck

The Jeep(left) and kei truck(right)
were made this past summer.
You can't see it in this picture but the jeep has a spare wheel mounted at the back. The jeep was given to a friend of ours for her son , Gavin.
The kei truck was inspired by our trip to the Cayman Islands back in May.
The truck was given to our godson, who lives in Grand Cayman with his Dad and Mom

No metal fasteners are used in any of my toys. I try to use joints whenever possible (eg: rabbet, dowel, butt).

Rabbet joints are used to increase the surface area that the glue can adhere to.

07 February 2009

Wood Dump Truck


The dump truck, pictured to the left, is the newest wood toy to join my fleet of toy trucks.
I used pine, hemlock, fir and other hard woods for materials.
The winch, seen, on the right side of the cab can be used to raise and lower the box.
The chassis and box are re used wood from the church pews that my Opa Mulder built in my hometown of Salmon Arm, B.C.